The iManage integration connects Actionstep with iManage, allowing you to manage your documents and matters in one seamless workflow. When you open a new matter in Actionstep, a corresponding iManage workspace is created automatically, with key data synced at the time of workspace creation. You can access and file documents in iManage directly from Actionstep. iManage stays as your main document repository, while Actionstep continues to handle your matter management, billing, and workflow automation.
Setting Up the iManage Integration
Before you begin:
- An Actionstep admin will need to go to Admin > General settings and toggle Enable iManage integration to on.
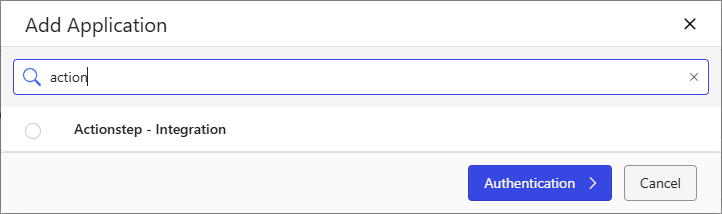
- An iManage admin will need to add Actionstep access in the iManage Control Center under Applications > Add Application. (Learn more.)
To set up and manage your iManage settings:
- In Practice Management, go to Admin > Integrations. The Integrations page appears.
- Locate the iManage option and click Connect with iManage. (If you’ve already connected the integration and want to make changes to the settings, click Manage.) The iManage page appears.
- Click Connect.
- If prompted for your iManage sign-in settings, provide them. (If you are currently signed in at CloudiManage.com, the integration will connect the integration using that account.)
- On the Actionstep iManage set-up page, in the Connection section, provide the following:
- iManage Library: Click this drop-down list to choose the library from your iManage implementation you want to connect to.
- In the Integration Settings section, provide the following:
- Automatically create new matters in iManage: Select this option to create a matter in iManage when you create and save a new matter in Actionstep.
- Update matters on close: Select this option if you want to update the matter in iManage when the matter’s status is changed to Closed. (When you select this option, you can specify a Workspace name prefix (e.g., Closed), which will be added to the iManage workspace title when the matter is closed in Actionstep.)
- Hide Actionstep DMS: Select this option to make sure the native document management system available in Actionstep is not available.
- New Default Workspace Owner: Specify the owner of workspaces created by the integration. Your options include Current User (iManage Account) (which is the the current signed-in iManage user), or iManage Admin / Service Account (which is the account used to connect the integration).
- In the Metadata Mapping section, map the following fields between iManage and Actionstep:
- Client ID, Matter ID, and Matter Type and their associated fields in iManage are required as well as locked. They cannot be changed.
- Matter Title, File Reference, Assigned To, Priority, and Status can be mapped to any custom iManage field you need.
- In the Document Type Destination section, enter the name of the folder Actionstep will create under the Actionstep Documents folder in each iManage Workspace. Invoices will be uploaded to this folder when they are downloaded from Billing > Invoices.NOTE: While this option specifically mentions invoices, all documents generated from a template (i.e., from the matter's Documents > Generate workflow within Actionstep) can be saved to iManage. Users will choose their specific iManage destination folder when generating the document.
- In the Matter Type Template Mapping section, do the following:
- Click the Matter type drop-down list and choose the matter type whose document folder structure you want to "pull" from the iManage library you’re synced to.
- Click Add to add that matter type to the list.
- For each matter type in the list, click the Template drop-down list and choose the iManage template that defines the folder structure you want to use.NOTE: If you don’t select a template, the default template will be used to define your folder structure.
- Click Save to save your changes.
Accessing iManage in Actionstep
You can access iManage functionality by viewing a matter and clicking the Documents menu icon.
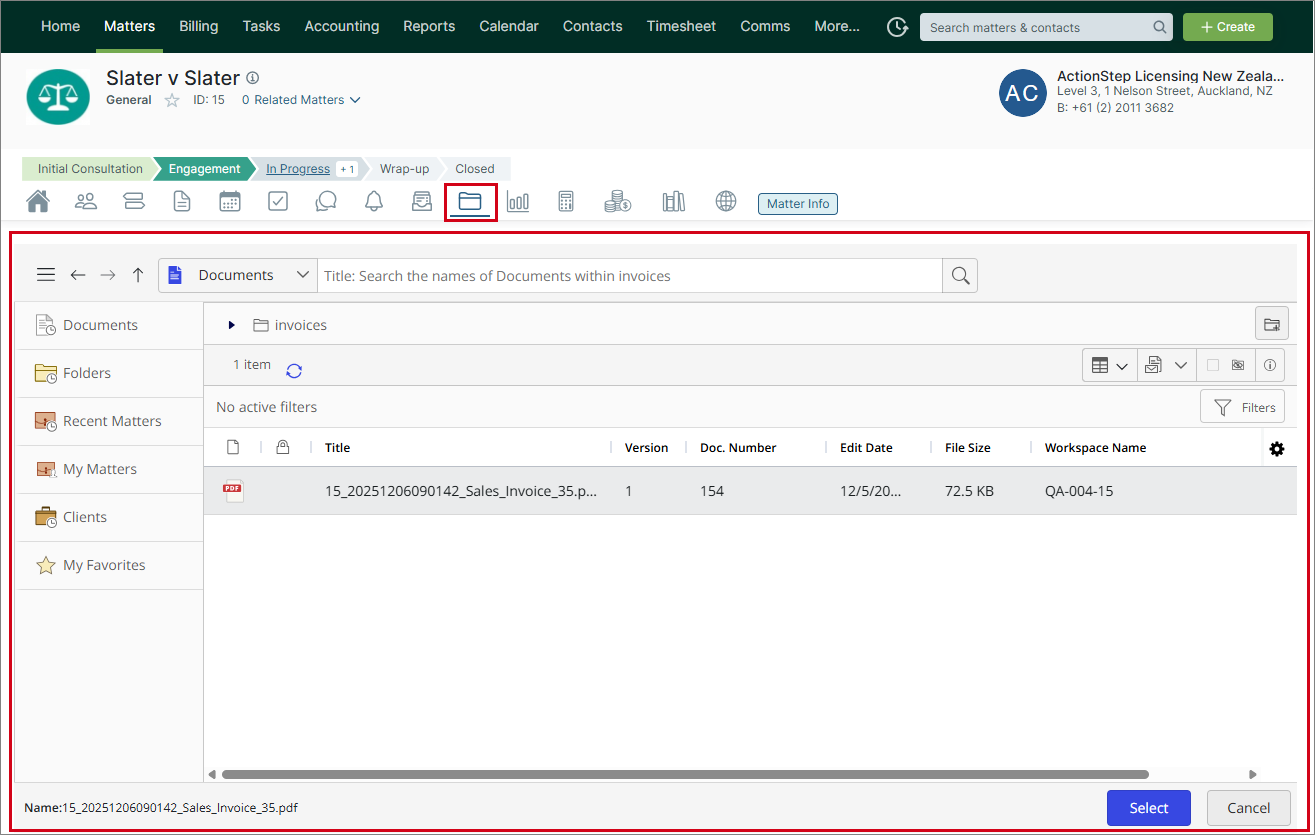
The iManage interface is displayed and gives you access to manage your documents and matters using the iManage functionality.
For instructions on using iManage features, use the iManage Resource Center.
Testing Your Environment
To test the Actionstep iManage integration, you have two set-up options. Both options allow you to test safely without exposing production data.
To test the Actionstep iManage integration, you have two set-up options. Both options allow you to test safely without exposing production data.
Option 1: Use iManage Staging / UAT (Recommended)
If your firm has an iManage staging or UAT environment, connect it to your Actionstep staging environment.
To do this:
- Sign in to your Actionstep staging environment (https://go.actionstepstaging.com/).
- Go to Admin > Integrations > iManage.
- Select Connect iManage.
- Go to Settings > Connection > iManage Library.
- Connect to your iManage staging/UAT library.
This option provides the closest approximation to a production setup while remaining fully isolated from live data.
Option 2: Use an Isolated iManage Library
If you do not have an iManage staging or UAT environment, you can still test safely by using an isolated iManage library.
To do this:
- Ask your iManage system administrator to create a new, dedicated iManage library specifically for beta testing.
- Sign in to your Actionstep staging or UAT environment (https://go.actionstepstaging.com/).
- Go to Admin > Integrations > iManage.
- Select Connect iManage.
- Go to Settings → Connection > iManage Library.
- Connect Actionstep to the newly created test iManage library.
This ensures that no production documents or metadata are affected during testing.
Was this article helpful?
That’s Great!
Thank you for your feedback
Sorry! We couldn't be helpful
Thank you for your feedback
Feedback sent
We appreciate your effort and will try to fix the article