Actionstep includes several menus. When you choose an option from a menu, either a page appears with options to complete some task (like pay a trust invoice) or a table appears, showing a list of items (like recorded time entries or a list of aged receivables). These tables are called list views, and they can either be a default list or a custom list.
To learn more about working with the content in a list view, see Getting to Know the List View Feature.
Working with Default List Views
Each Actionstep menu has default list views in it. Choosing one of these default options displays a table of information. These lists typically aren’t customizable beyond what options are available by default, but you can filter them to show only the information you want to see. You can also save the data in these lists by printing it, exporting it, or creating a head’s up alert for it. (This type of reporting can be useful if Actionstep doesn’t include an existing report showing the exact data you need to capture.)
There are many default list views throughout Actionstep, but here are a few specific examples:
- Matters > Matters List
- Contacts > Contacts List
- Accounting > Supplier Invoices > Payments
- Timesheet > Expenses List
- Tasks > My Tasks > High Priority
- Etc.
Working with Custom List Views
Custom list views allow admin users to create highly customized lists of information. For example, if you want to view a list of only active Criminal Law matters that are in discovery, you could create a custom matter list view that defines these parameters. When a user selects this option from the Matters menu, the resulting page will show a list of all active criminal law cases that are on the discovery workflow step. Setting up this list can save you time you would otherwise spend filtering and searching for a specific set of cases.
Admin users can create custom list views for the following workflows:
- Matters (accessible from the Matters menu)
- Contacts (accessible from the Contacts menu)
- Time entries (accessible from the main Timesheet menu)
- Task lists (accessible from the Tasks menu)
- Disbursements (accessible from the Timesheet > Disbursements menu)
- Appointments (accessible from the Calendar > Appointments menu)
You must be an admin user to create custom list views. These list views can be permissioned so only specific participant types can access them.
Custom List View Groups
When creating a custom list view, you may want to set up several related lists. If you want these lists to be accessible from the same menu option, you can define a menu group name.
For example, let’s say you want to create two matter list views for your Appeals matter type: Appeals (Active) and Appeals (All). When you set this up, if you assign a common Menu group name (Appeals), any lists you create with this group name will be shown as submenus:

Your group list views can be as simple or complicated as you need. In this example, the Criminal Law menu group has several list views available for it:
Main Components of a List View
Each custom list view includes some basic components that define how the list is accessed as well as what gets displayed in the list. Specifically:
- A list view name: This name will be visible to all users who have access to the menu option, so it should be unique and descriptive.
- A sort order: If you intend to group several related list views together in a menu group, you'll want to carefully plan how they will be organized and define the order you want them listed in. (See the example below for a more in-depth description of how this works.)
- System Role Permissions: You must choose which system roles will have access to the list view.
- Locked filters: You must choose the data that will "trigger" whether the item will be included in the list. For example, you can create a list that shows only active matters by selecting the "active" action_status locked filter.
- Column definitions: You must choose which columns will be shown in the list. For example, in a custom matter list view, you might want to include who the matter is assigned to, the matter's ID, and its current workflow step. You probably want the matter name and ID to be included, as well. You can choose these different data points to include.
You can assign any sort ordering numbers you want to a collection of list views, but it's recommended you include incremental gaps between each number so you can more easily make changes to the list later. Items with lower sort numbers are shown first in the list.
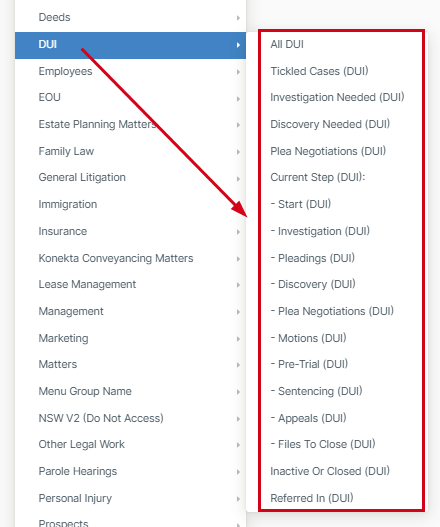
In this example, the Matters menu includes a DUI menu group that then lists several individual list views that display DUI-related matters at the various stages of completion:
 When these list views were created, a specific sort order was assigned to each list so that they would appear in the correct order. As shown in the example below, the first items in the list are assigned a lower number while the last are assigned a high number:
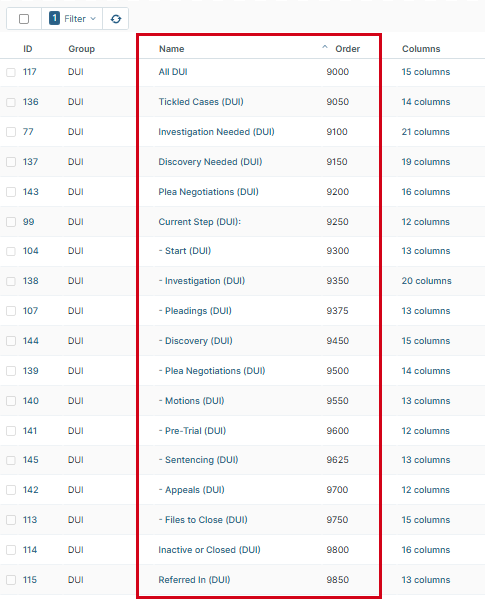 The user who created this list opted to leave numeric gaps in the sort order numbering by incrementing the numbers by 25 or 50 (i.e., 9000, 9050, 9100, etc.). This allows this list to be edited later without requiring the user to update every item in the list when new items were added (e.g., Pleadings (DUI)).
Please note, grouped menu names are listed alphabetically.
Additional Resources:
Was this article helpful?
That’s Great!
Thank you for your feedback
Sorry! We couldn't be helpful
Thank you for your feedback
Feedback sent
We appreciate your effort and will try to fix the article