Supplier invoices (also called Vendor invoices) are the bills that are sent to you for your company to pay. These are an important way for you to manage your company's expenses on a day to day basis.
In this article, we will show you one of the two ways that you can create a new supplier invoice in Actionstep, by using the Quick Entry Wizard. The other way can be found here - Creating a Supplier Invoice/Vendor Invoice
Overview
This method is designed to be a faster way for you to enter supplier invoices into Actionstep. It presents you with the basic information you will need for a supplier invoice and allows you to create record after record in a string.
You can only create supplier invoices using the Quick Entry Wizard from the list of supplier invoices. Go to the Accounting menu, look under Supplier Invoices and choose Supplier Invoice. Then click Quick Entry Wizard above the list of supplier invoices.

The screen that will open will have three parts to it.
- The top of the screen is where you enter the details of the supplier invoice (who the supplier was, the number, if it is linked to a matter, etc.).
- The middle of the screen is where you enter the details of the line items for the supplier invoice.
- The bottom of the screen has options for the Quick Entry Wizard which will allow you to save the record and move onto the next supplier invoice, stop entering supplier invoices or upload supporting documents to the supplier invoices you are creating.
We explain each of these sections in more detail below.
Entering the details of the supplier invoice into the Quick Entry Wizard
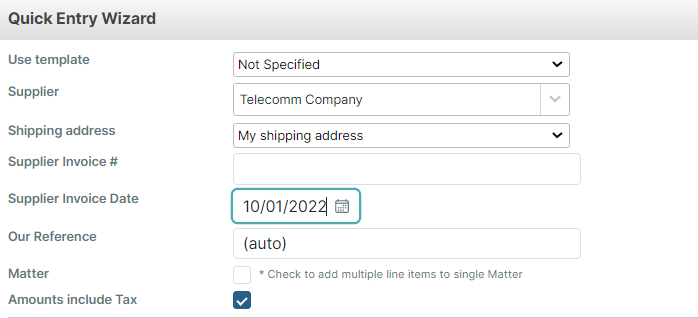
You will likely only need to populate four of the above fields for each supplier invoice: The template (if applicable), the supplier, the supplier number and the invoice date.
We explain all the fields in more detail below:
| Field | Description |
| Use Template | Here you can choose to apply a Purchase template to the supplier invoice that you are creating. This is an optional field. Tip: You can use purchase templates, which are pre-entered supplier invoices. Using Actionstep, you you can create a supplier invoice as a template - which is called a 'Purchase template'. It will save the supplier, the line items and the amounts that you would want on an invoice. |
| Supplier | This is the person who issued you the invoice, the person or company that you have to pay. Actionstep expects you to have a contact record for the supplier in the system and this field allows you to search for that contact. To search for the contact, enter their name. The list of all contacts in the company will be filtered down by those that match your search. For each contact, Actionstep will display the name, address, city, if they are an individual or company, and a phone number. If you want to filter by one of these other options that are displayed, click on the 'Filter Results' button that appears at the bottom of the search box. IF you are creating a supplier invoice for a new supplier, click the 'New Participant' button that appears at the bottom of the search box. |
| Shipping address | Shipping address is very rarely used by any law firms. For most users, they can leave it set to the default. If you do order goods to be delivered on behalf of your clients, you may want to change the option to reflect the address that the goods that the supplier invoice is for, will be shipped to. |
| Supplier Invoice # | This is where you will enter the supplier invoice number of the invoice you received. This is the number that your supplier/vendor generated for this invoice. This is normally displayed on the paper or PDF copy of the invoice near the top. We record this so that it is easy to search for and find the supplier invoice using the supplier's reference. |
| Supplier Invoice Date | This is the date that the supplier issued the invoice. Recording this will help you understand when it is due and will help identify invoices from the same supplier. |
| Our Reference | This is the reference that Actionstep will keep for the supplier invoice you are about to create. This will be an internal reference and Actionstep will, by default, automatically assign a sequential number to each supplier invoice. You are able to click into this box and manually enter a reference yourself but there is little benefit to this, and you may be stopped from progressing if you enter a reference that is already being used by another supplier invoice. |
| Currency | This field will only be presented if you have multi-currency accounting enabled in your system. If it does appear, you can use this field to set what currency this supplier invoice will be set to. |
| Exchange Rate | Used in conjunction with the 'Currency' field (see above), you will use this to enter the exchange rate for the currency that the supplier invoice will be in. Again, this field only appears if your system is configured to have more than one currency set. |
| Matter | This field allows you to search for and select a matter in your system so that you can associate with the supplier invoice that you are creating. If you tick the box, Actionstep will display a search box to allow you to search for and select the matter that this supplier invoice should be linked to. This option is used if you need to:
Even if you are not going to bill a supplier invoice onto your client, if it is for one matter you may want to still associate it to a matter. Reports like the Multi Matter Profitability Report will give you insight into your profitable matters if you record costs against them. NOTE: Select the checkbox if you need to add multiple line items to a single matter. |
| Amounts include GST/VAT | This controls if the amounts that you enter into the line item section will be inclusive of sales or exclusive. This field will display differently in different regions. In Australia and New Zealand, it will be called "Amounts include GST". In the UK it will be called "amounts include VAT". NOTE: This does not change the rate of sales tax that is applied. This is still set on individual line items. Sales tax will be calculated correctly in each line item regardless of whether items are inclusive or exclusive of sales tax |
Entering the details of the line items into the Quick Entry Wizard
In this section, you will enter in the items that you are going to be billed for. You will need at least one line item for your supplier invoice.
You can create more lines by clicking the Add Line link.
If you make a mistake and want to remove a line, click on the to the right of the line.

| TIP: Most users will enter in one line item for a supplier invoice, even if that supplier invoice has multiple lines displayed in the paper/PDF copy received. By summarising together lines into one line you cut down on the amount of data entry required. There will be exceptions, however.
|
There are up to eight different columns that will appear on the Quick Entry Wizard line items. We explain each in more detail below.
| Column Heading | Description |
| Matter | This column will only appear if you have not linked the supplier invoice to a matter. If it appears, then you can choose a matter in Actionstep that will be linked to cost in this line item. If you want to bill a cost onto a client, then you will have to populate this column or have the whole invoice linked to a matter. EXAMPLE: Supplier invoices as a whole can be linked to a matter or, if the whole supplier invoice is not linked, you can link individual items. If you engage the services of a contractor to work on one matter, you will link the whole supplier invoice that the contract gives you to the matter. If you have documents couriered on a daily basis that are only charged per month by the courier company, then the supplier invoice from the courier company would not be linked to a single matter. For any couriers that you can link to specific matters, you would create a separate line item in the supplier invoice for each matter, so that you can break the courier costs down by the matter they are for. |
| Account | This must be populated for every line item in your firm withdrawal. Select the general ledger account that you would like this item coded to. Think of this as a way to categorize what type of expense this line item is for. You are able to type the account name or number to help find it faster. The Cost of Sale and then the Expenses general ledger accounts will display first but you are able to select any GL account from this box except for some system accounts or bank accounts. |
| Tax | Choose what sales tax rate will be applied to this line item. This field should populate to the default tax rate when you select the general ledger account from the 'Expense Account' field (above). |
| Bill | To bill this line item onto your client, switch this to 'On'. Actionstep will automatically create a billable expense record for the appropriate matter. The next time you bill that matter, the expense will be included in that bill. To bill the cost of a supplier invoice onto a client, the following parts of a line item will need to be set:
|
| Exp Code | UTBMS (or Uniform Task-Based Management System) is a process where the items you bill are categorized based on a fixed set of codes. This is a system required by some clients of law firms to help them understand the breakdown of what they are being billed for. In the supplier invoice line item, we have this so that if you bill this line item onto your client, you can assign a UTMBS code to that billable item as you create it. If you don't Bill using LEDES or UTBMS then please ignore this option. |
| Description | Enter the description of the line item. |
| Quantity | Use this column to show how many items are in this line item. EXAMPLE: You might have been charged for the leasing of five computers at $125.00 each. In that case, you would enter "5" into the 'Quantity' column and enter "125" into the 'Unit Cost' column. This will give you a total cost of $625.00. Or, you might have worked with a contractor to supply extra legal services. They complete 35 hours at $150.00 per hour. In that case, you would enter "35" under the 'Quantity' column and enter "150" into the 'Unit Cost' column. This will give you a total cost of $5,850.00. |
| Unit Cost | This is the cost of each item in the line item. The Unit Cost and the Quantity columns will calculate the total value of a line item. |
Options for the Quick Entry Wizard

Under the section with the line items, you will see a summary of the total costs and taxes and a number of buttons.
Some options only appear once you have created the first supplier invoice. There will be a box summarizing the last entered supplier invoice and the 'New Entries' button.
Using the 'Save and Create New' and 'Save and Close' buttons
When you have a number of supplier invoices to enter, enter the details of the first supplier invoice then click the Save and Create New button. The record will save and you can enter the next supplier invoice's details. The previous supplier invoice will be summarised in a box at the bottom of the screen.
When you enter your last supplier invoice, then you can click the Save and Close button.
Editing a supplier invoice you have just created through the Quick Entry Wizard
Click 'Edit' beside the previous supplier invoice to open and edit it. This will open the supplier invoice screen where you can click 'Edit' in the bottom left-hand corner to make changes.
You can also click New Entries to see a list of all the supplier invoices you have just created through the Quick Entry method. You can then click the 'Edit' link beside the supplier invoice you want to change to open and edit it.
Adding supporting documents to a supplier invoice you have just created through the quick entry wizard
Click 'Upload File' beside the previous supplier invoice to be able to upload a file from your computer. Use this to upload supporting documents like scanned copies of the invoice from the supplier.
You can also click New Entries to see a list of all the supplier invoices you have just created through the Quick Entry method. You can then click the 'Upload File' link beside the supplier invoice that you want add a document to.
Was this article helpful?
That’s Great!
Thank you for your feedback
Sorry! We couldn't be helpful
Thank you for your feedback
Feedback sent
We appreciate your effort and will try to fix the article