The iManage integration connects Actionstep with iManage, allowing you to manage your documents and matters in one seamless workflow. When you open a new matter in Actionstep, a corresponding iManage workspace is created automatically, with key data synced at the time of workspace creation. You can access and file documents in iManage directly from Actionstep. iManage stays as your main document repository, while Actionstep continues to handle your matter management, billing, and workflow automation.
NOTE: These instructions assume you are proficient in using iManage. No attempt is made to explain how to use that product. If you need help understanding or working with iManage, please visit their help center.
Before enabling the iManage integration, confirm the following:
- Your firm uses iManage Cloud. On-premises iManage deployments are not supported.
- You have admin access to both Actionstep and your iManage Control Center (iMCC).
- Only one iManage library can be connected per Actionstep organization. If your firm uses multiple libraries, determine which library will be used before setup.
Setting Up the iManage Integration
Before you begin:
- An Actionstep admin will need to go to Admin > General settings and toggle Enable iManage integration to on.
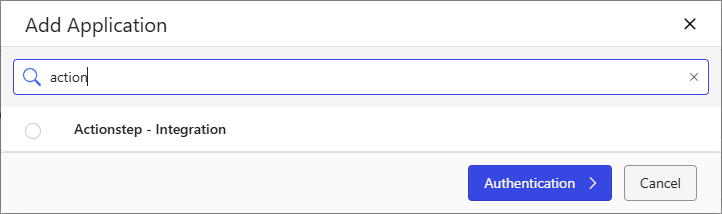
- An iManage admin will need to add Actionstep access in the iManage Control Center under Applications > Add Application. Please note, when searching for the application, search for Actionstep - Integrations. This is the exact app name to add. (Learn more.)
- Connect the integration while signed in to iManage with an administrator or dedicated service account. The connecting account is recorded as the integration's account.
To set up and manage your iManage settings:
- In Practice Management, go to Admin > Integrations. The Integrations page appears.
- Locate the iManage option and click Connect with iManage. (If you’ve already connected the integration and want to make changes to the settings, click Manage.) The iManage page appears.
- Click Connect.
- If prompted for your iManage sign-in settings, provide them. (If you are currently signed in at CloudiManage.com, the integration will connect the integration using that account.)
- On the Actionstep iManage set-up page, in the Connection section, provide the following:
- iManage Library: Click this drop-down list to choose the library from your iManage implementation you want to connect to.
- In the Integration Settings section, provide the following:
-
Automatically create new matters in iManage: Select this option to create a matter in iManage when you create and save a new matter in Actionstep.
Note: To create iManage workspaces correctly, every Actionstep matter must have a Client selected while the matter is created. If a matter is created without a Client, Actionstep may not be able to create the corresponding iManage workspace correctly. Consider making Client a required field on matter creation for any matter types that use the iManage integration.
- Update matters on close: When enabled, Actionstep will prepend a configurable tag to the iManage workspace title when the matter is closed in Actionstep. For example, if you configure the prefix as "CLOSED", a matter titled "Smith v Jones" will be renamed to "CLOSED - Smith v Jones" in iManage. This helps surface closed matters visually within iManage without removing them.
- Hide Actionstep DMS: Select this option to make sure the native document management system available in Actionstep is not available.
- New Default Workspace Owner: Specify the owner of workspaces created by the integration. Your options include Current User (iManage Account) (which is the the current signed-in iManage user), or iManage Admin / Service Account (which is the account used to connect the integration).
-
- In the Metadata Mapping section, map the following fields between iManage and Actionstep:
- Client ID, Matter ID, and Matter Type and their associated fields in iManage are required as well as locked. They cannot be changed.
-
Matter Title, File Reference, Assigned To, Priority, and Status can be mapped to any custom iManage field you need.
Caution: Please see the section A Few Things About Mapping Your Metadata (below) for more information about mapping fields between Actionstep and iManage.
-
In the Document Type Destination section, enter the name of the folder Actionstep will create under the Actionstep Documents folder in each iManage Workspace. Invoices will be uploaded to this folder when they are downloaded from Billing > Invoices.
NOTE: While this option specifically mentions invoices, all documents generated from a template (i.e., from the matter's Documents > Generate workflow within Actionstep) can be saved to iManage. Users will choose their specific iManage destination folder when generating the document.
- In the Matter Type Template Mapping section, do the following:
- Click the Matter type drop-down list and choose the matter type whose document folder structure you want to "pull" from the iManage library you’re synced to.
- Click Add to add that matter type to the list.
-
For each matter type in the list, click the Template drop-down list and choose the iManage template that defines the folder structure you want to use.
NOTES: iManage workspace security is defined by the template applied at creation. After the workspace is created, security is managed independently in each system — the integration does not sync permissions or access changes between Actionstep and iManage. Restricting a matter in Actionstep does not restrict the corresponding iManage workspace; firms using restricted matters should manage iManage workspace access separately.
- Click Save to save your changes.
Verifying Your Integration Setup
After setup, you can confirm the integration is connected in Actionstep and that the iManage application is configured correctly.
To confirm the integration is connected in Actionstep:
- Sign in to Actionstep with an administrator account.
- Go to Admin > Integrations. The Integrations page appears.
- In the list of integrations, locate the iManage integration and confirm it shows as connected.
- If the integration is not connected, complete the steps in Setting Up the iManage Integration (above) and reconnect.
To confirm the iManage application configuration:
- Open the iManage Control Center.
- In the left-hand menu, go to Settings > Applications.
- Select Actionstep - Integration.
- Confirm Status is set to Enabled.
-
In the Authentication section, confirm the settings match the values in the following table below. Specifically, confirm Security is set to All Users.
Setting Expected Value Allow Refresh Token Yes Refresh Token Expiry 365 days Access Token Expiry 90 mins Security All Users Note: The All Users security setting controls which iManage users can authenticate through the Actionstep application. It does not change how document or workspace permissions are managed. iManage workspace security continues to be defined by the template applied at workspace creation, as described above.
- If any value does not match, update it in the iManage Control Center and save your work. If the values match and the integration still does not connect, contact Actionstep Support.
A Few Things About Mapping Your Metadata
If your firm has matters that were migrated from a legacy system, Actionstep will attempt to automatically link these to existing iManage workspaces when you open the iManage panel from the matter. The linking logic works as follows:
- Actionstep first attempts to match using the Actionstep Matter ID field.
- If no match is found and File Reference (legacy system ID) is mapped in the Metadata Mapping section, Actionstep will attempt to match using the File Reference value.
- If no match is found, or multiple matches are returned, you will be prompted to paste the iManage workspace URL directly to complete the link.
To get the best auto-match results for legacy matters, ensure that your File Reference field in Actionstep contains the legacy matter number used in iManage, and that your iManage custom field mapping is configured correctly in the Metadata Mapping section above.
The Client field should be required when creating matters that use iManage. The Client value is used when creating and mapping the iManage workspace. Matters created without a Client may not create or map correctly in iManage.
Additionally, if a matter in Actionstep has more than one client, the integration passes only the first client's ID and name to iManage. Additional clients on the matter are not reflected in the iManage workspace metadata.
Finally, metadata is synced from Actionstep to iManage at workspace creation only. The exception is matter title — if the matter title changes in Actionstep, the iManage workspace name will be updated to reflect it. Additionally, closing a matter in Actionstep will close the corresponding workspace in iManage. No other metadata fields sync after the workspace is created.
Accessing iManage in Actionstep
You can access iManage functionality by viewing a matter and clicking the Documents menu icon.
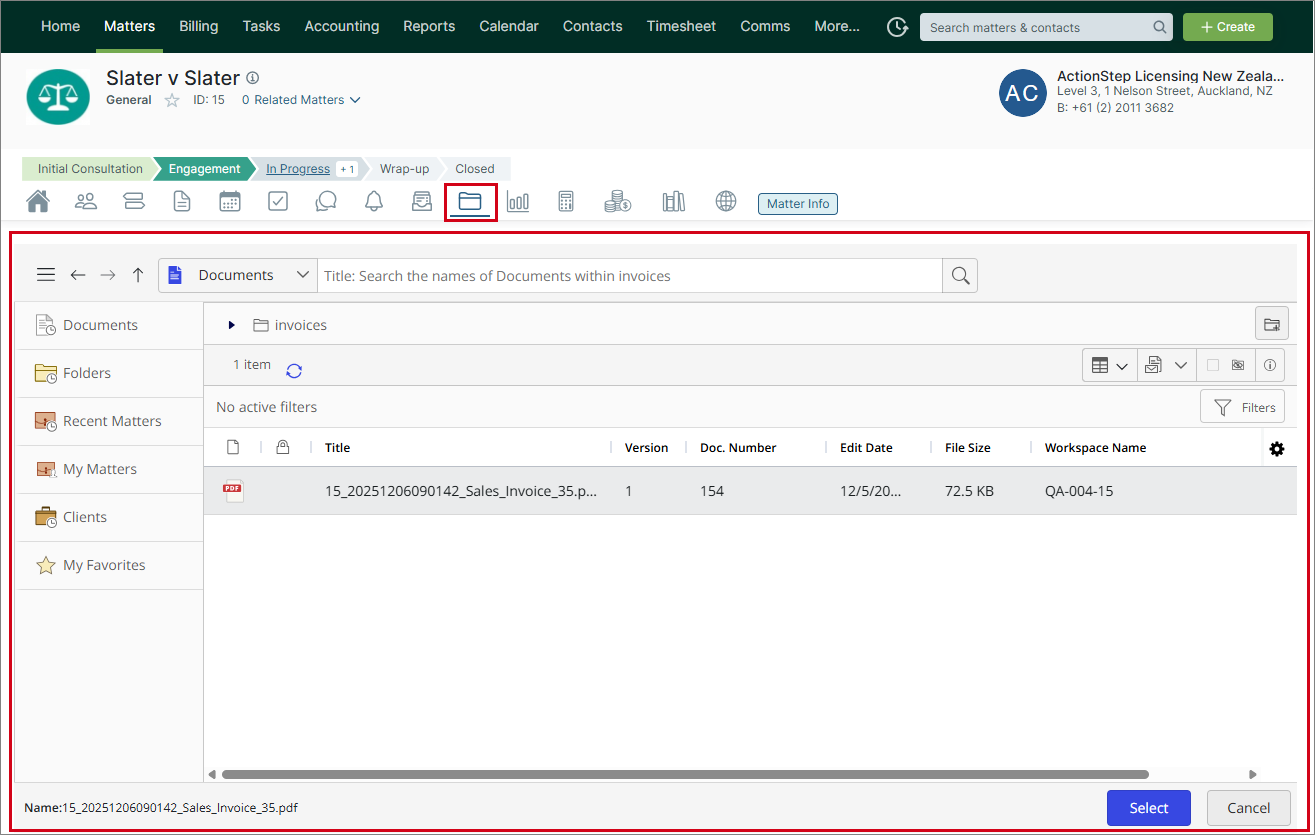
The iManage interface is displayed and gives you access to manage your documents and matters using the iManage functionality.
NOTE: To make sure PDF invoices are properly uploaded to iManage, go to the matter's Billing > Invoices page and click the PDF icon for the specific invoice you want to upload. This downloads a copy of the PDF to your computer and uploads a copy to your Invoices folder in iManage.
For instructions on using iManage features, use the iManage Resource Center.
Testing the iManage Integration Setup
To test the Actionstep iManage integration, you have two set-up options. Both options allow you to test safely without exposing production data.
NOTE: If your firm does not have an Actionstep staging environment, please submit an Actionstep Support ticket. Please specify in the ticket the orgkey name for the live database you want to use. Please note, this staging database will expire after 30 days, so allow sufficient time to test, validate, and plan your integration roll-out.
Option 1: Use iManage Staging / UAT (Recommended)
If your firm has an iManage staging or UAT environment, connect it to your Actionstep staging environment.
To do this:
- Sign in to your Actionstep staging environment (https://go.actionstepstaging.com/).
- Go to Admin > Integrations > iManage.
- Select Connect iManage.
- Go to Settings > Connection > iManage Library.
- Connect to your iManage staging/UAT library.
This option provides the closest approximation to a production setup while remaining fully isolated from live data.
Option 2: Use an Isolated iManage Library
If you do not have an iManage staging or UAT environment, you can still test safely by using an isolated iManage library.
To do this:
- Ask your iManage system administrator to create a new, dedicated iManage library specifically for beta testing.
- Sign in to your Actionstep staging or UAT environment (https://go.actionstepstaging.com/).
- Go to Admin > Integrations > iManage.
- Select Connect iManage.
- Go to Settings > Connection > iManage Library.
- Connect Actionstep to the newly created test iManage library.
This ensures that no production documents or metadata are affected during testing.
Updated